> ## Documentation Index
> Fetch the complete documentation index at: https://docs.getprimo.com/llms.txt
> Use this file to discover all available pages before exploring further.
# Zero-touch for Windows
> Windows Autopilot gives new Windows devices an out-of-the-box setup experience. When an employee powers on a device for the first time, they sign in with their Microsoft credentials, and Autopilot applies all company apps, settings, and security policies automatically — no IT intervention required.
## Prerequisites
* A Microsoft account with administrator access to an Entra tenant
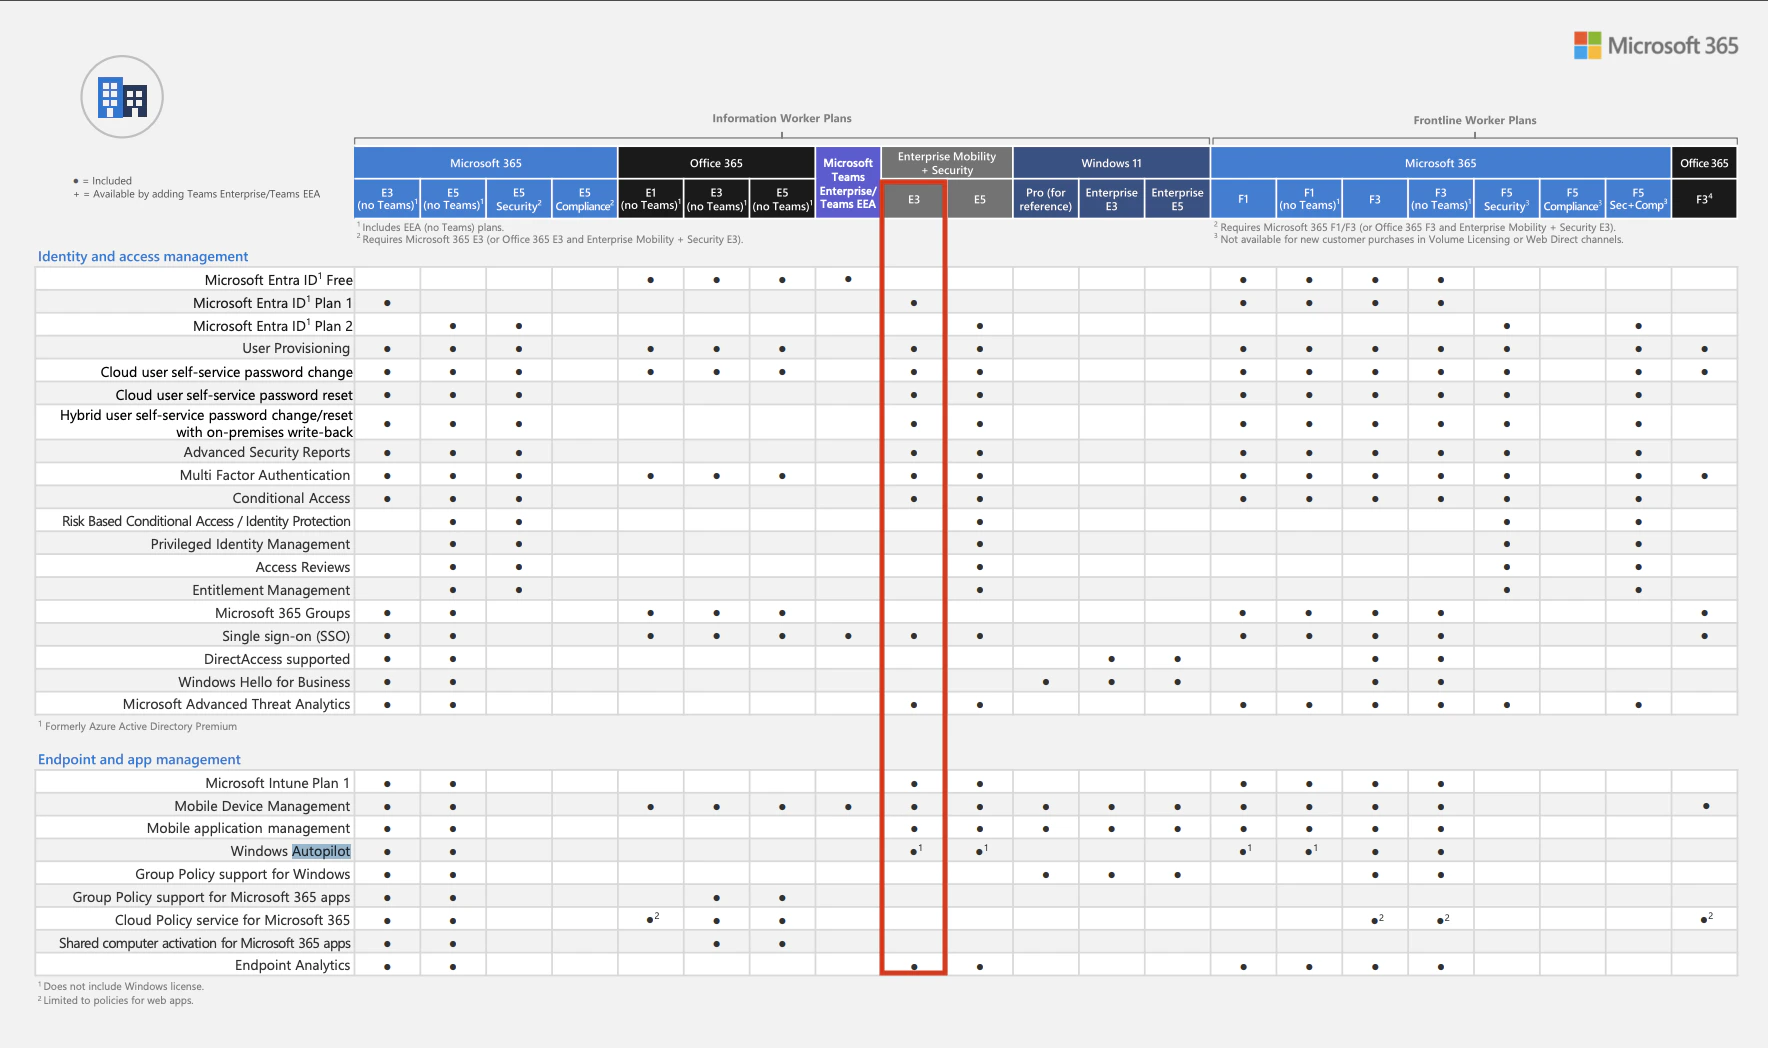
* A license that includes **Microsoft Entra ID Plan 1** (or **Plan 2**) & **Windows Autopilot**
The minimum license covering both features is **Enterprise Mobility + Security E3** ([compare plans](https://www.microsoft.com/fr-fr/microsoft-365/enterprise-mobility-security/compare-plans-and-pricing)).
 ## Restrictions
Autopilot devices use **Entra accounts** rather than local accounts. Microsoft is progressively deprecating local accounts in favor of Entra accounts.
The Entra administrator can configure whether users have standard or administrator account privileges. Entra users with the **Global Administrator** role are automatically administrators on all Autopilot devices they sign into.
The device needs internet access during the first boot to authenticate with Entra.
## Set up zero-touch
This step requires coordination with Primo support. Microsoft generates a verification code — share it with the Primo team. Allow up to **2 business days** for us to validate the code after you send it.
1. Sign in to [Microsoft Azure](https://portal.azure.com/) with an administrator account.
2. Open [**Domain names**](https://portal.azure.com/#view/Microsoft_AAD_IAM/DomainsList.ReactView) and click **+ Add custom domain**.
3. Enter `{company}.mdm.getprimo.com`. [Contact support](mailto:support@getprimo.com) if you don't know your domain.
4. Share two values with the Primo team: the **Destination or routing address** (format: `MS=ms12345678`) and your **Tenant ID** (visible on the [Microsoft Entra overview page](https://portal.azure.com/#view/Microsoft_AAD_IAM/ActiveDirectoryMenuBlade/~/Overview)). Fleet needs the Tenant ID to authorize enrollment from your tenant.
5. Wait for our confirmation before clicking **Verify**.
1. Go to [**Mobility (MDM and MAM)**](https://portal.azure.com/#view/Microsoft_AAD_IAM/MdmAppsListBlade) and click **+ Add application > + Create your own application**. Enter `Primo` as the name and click **Create**.
2. Fill in the MDM URLs and click **Save**:
Replace `{company}` with your slug
```text theme={null}
https://{company}.mdm.getprimo.com/api/mdm/microsoft/tos
```
```text theme={null}
https://{company}.mdm.getprimo.com/api/mdm/microsoft/discovery
```
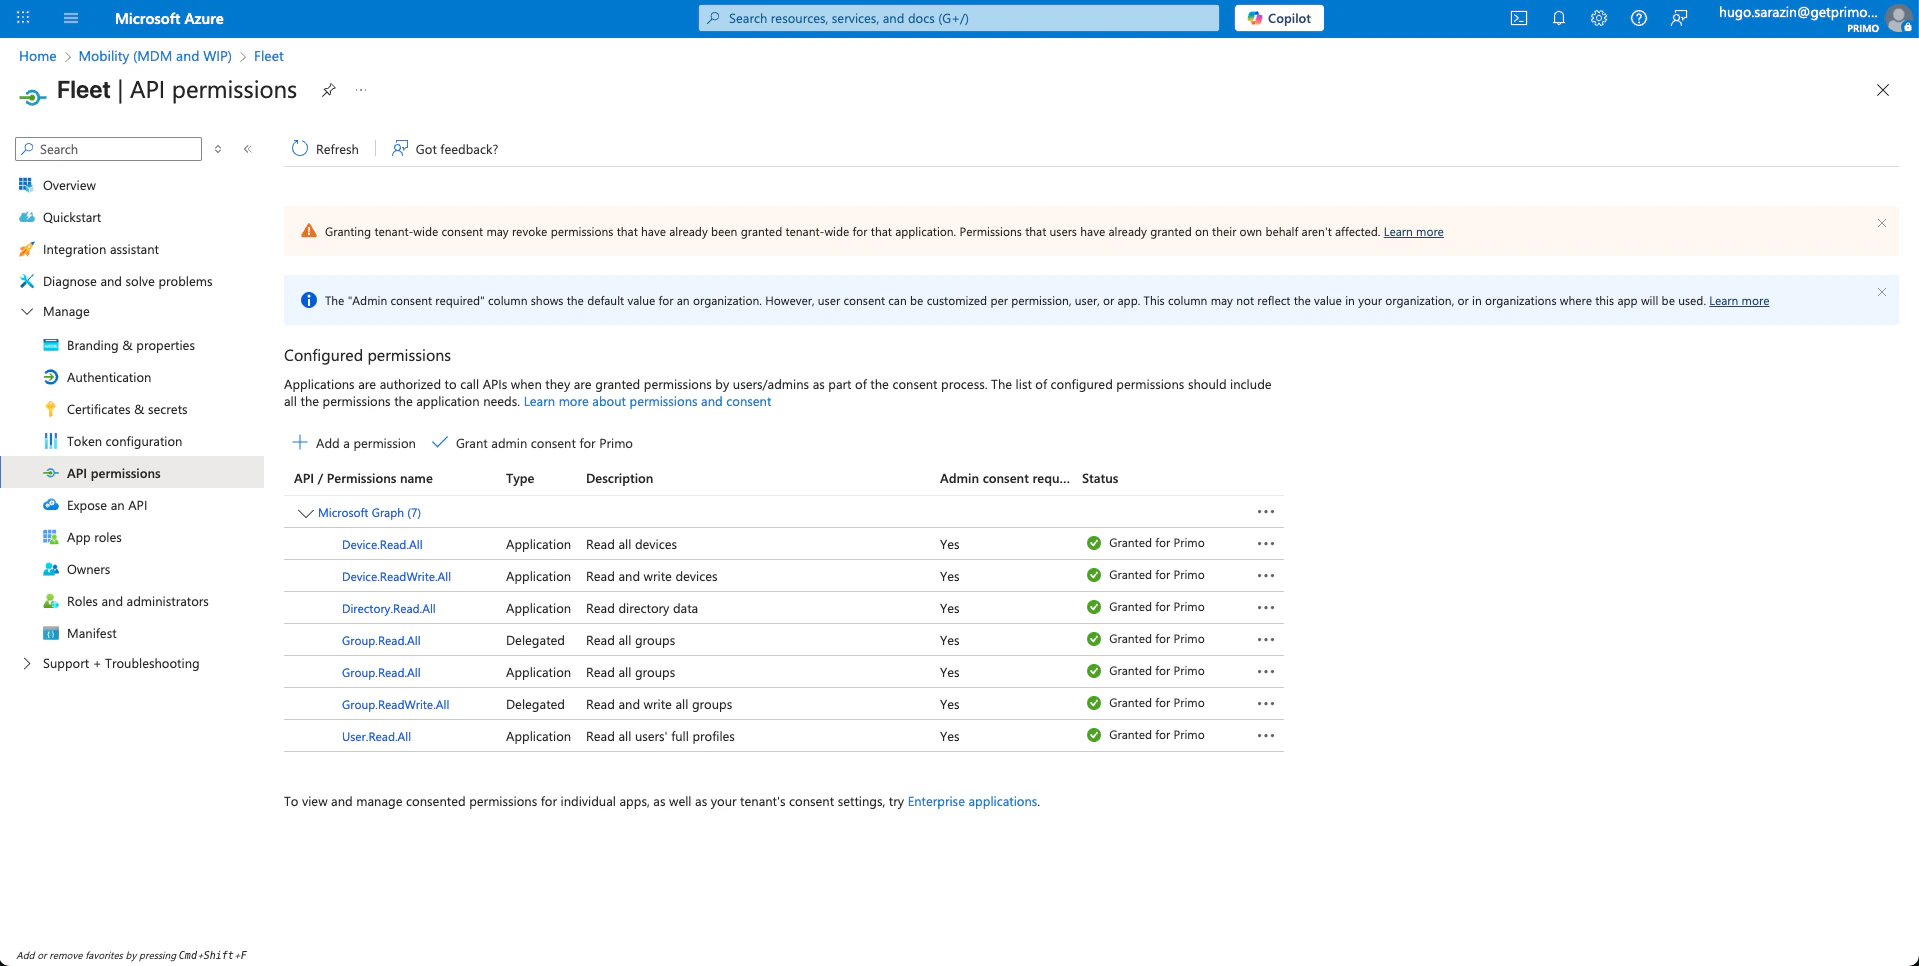
3. Open the **Fleet** application > **Custom MDM application settings** > click the link under **Application ID URI** > **Edit** > enter `https://{company}.mdm.getprimo.com` > **Save**.
4. On the same page, copy the **Application (client) ID** and share it with the Primo team. We register it on your Fleet instance, together with your Tenant ID, to complete the Windows enrollment configuration.
## Restrictions
Autopilot devices use **Entra accounts** rather than local accounts. Microsoft is progressively deprecating local accounts in favor of Entra accounts.
The Entra administrator can configure whether users have standard or administrator account privileges. Entra users with the **Global Administrator** role are automatically administrators on all Autopilot devices they sign into.
The device needs internet access during the first boot to authenticate with Entra.
## Set up zero-touch
This step requires coordination with Primo support. Microsoft generates a verification code — share it with the Primo team. Allow up to **2 business days** for us to validate the code after you send it.
1. Sign in to [Microsoft Azure](https://portal.azure.com/) with an administrator account.
2. Open [**Domain names**](https://portal.azure.com/#view/Microsoft_AAD_IAM/DomainsList.ReactView) and click **+ Add custom domain**.
3. Enter `{company}.mdm.getprimo.com`. [Contact support](mailto:support@getprimo.com) if you don't know your domain.
4. Share two values with the Primo team: the **Destination or routing address** (format: `MS=ms12345678`) and your **Tenant ID** (visible on the [Microsoft Entra overview page](https://portal.azure.com/#view/Microsoft_AAD_IAM/ActiveDirectoryMenuBlade/~/Overview)). Fleet needs the Tenant ID to authorize enrollment from your tenant.
5. Wait for our confirmation before clicking **Verify**.
1. Go to [**Mobility (MDM and MAM)**](https://portal.azure.com/#view/Microsoft_AAD_IAM/MdmAppsListBlade) and click **+ Add application > + Create your own application**. Enter `Primo` as the name and click **Create**.
2. Fill in the MDM URLs and click **Save**:
Replace `{company}` with your slug
```text theme={null}
https://{company}.mdm.getprimo.com/api/mdm/microsoft/tos
```
```text theme={null}
https://{company}.mdm.getprimo.com/api/mdm/microsoft/discovery
```
3. Open the **Fleet** application > **Custom MDM application settings** > click the link under **Application ID URI** > **Edit** > enter `https://{company}.mdm.getprimo.com` > **Save**.
4. On the same page, copy the **Application (client) ID** and share it with the Primo team. We register it on your Fleet instance, together with your Tenant ID, to complete the Windows enrollment configuration.
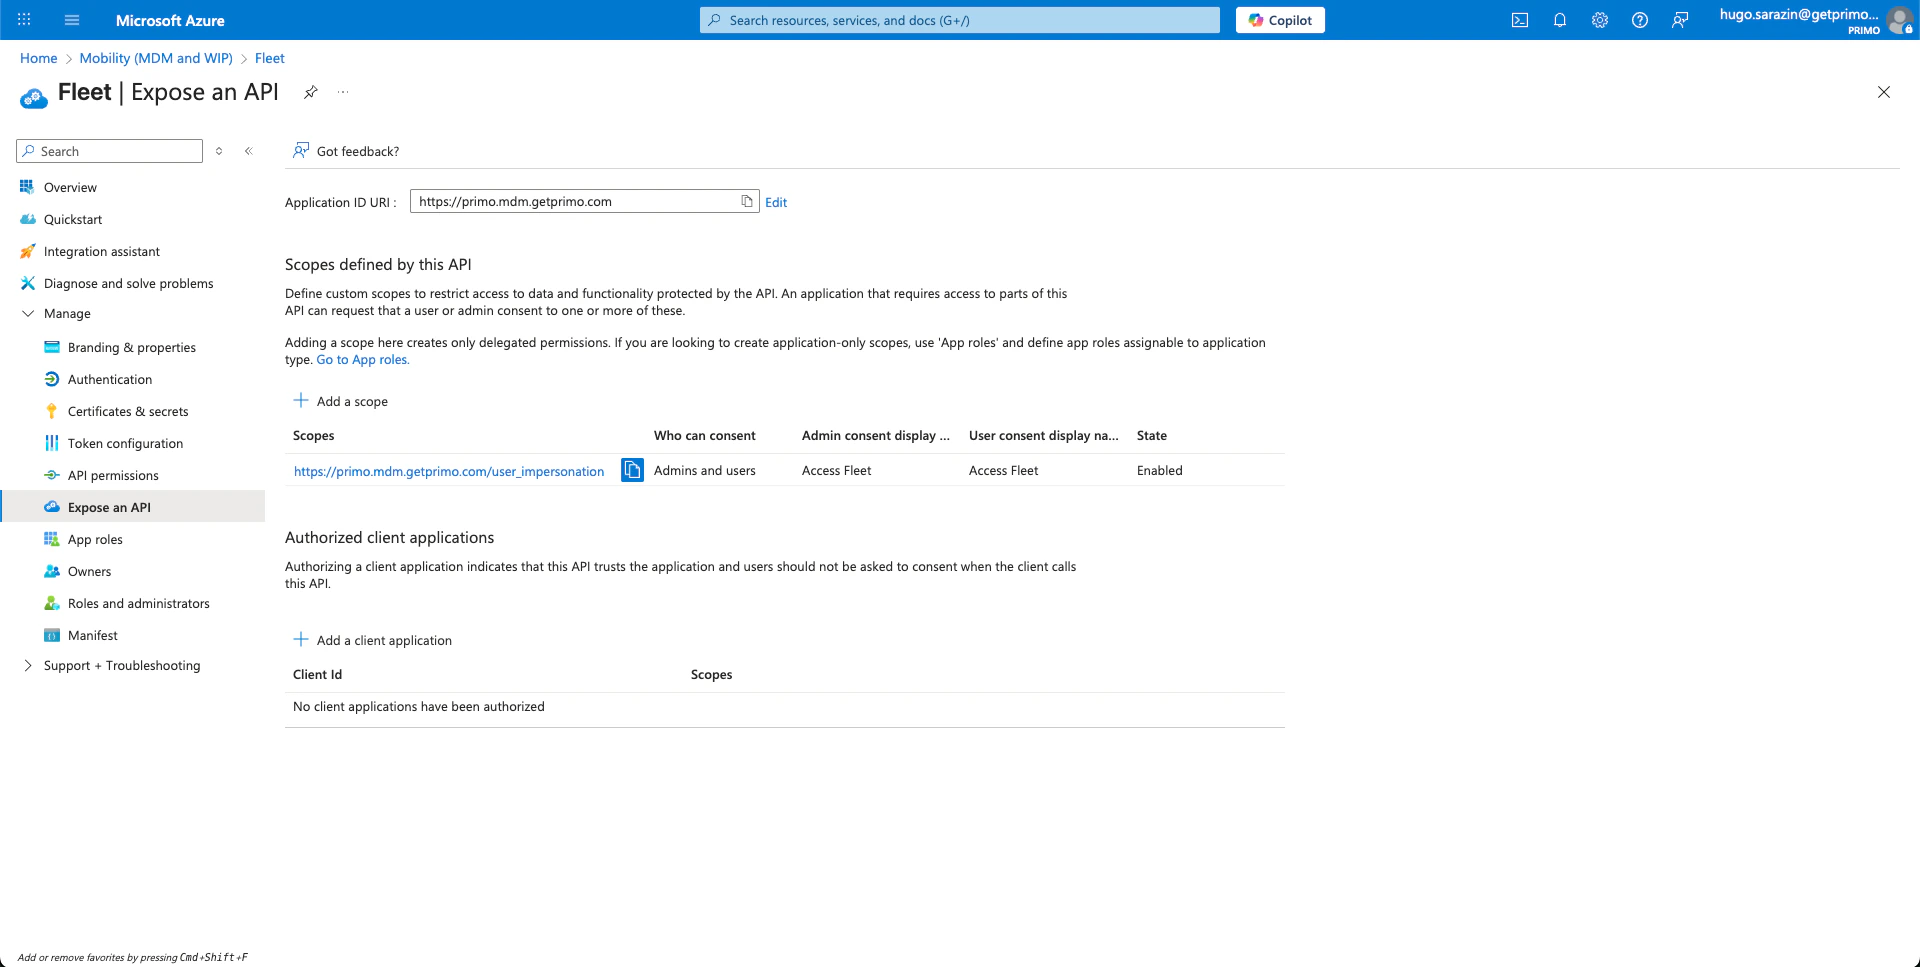 5. Go to **API permissions > Add a permission > Microsoft Graph > Delegated permissions** and add:
```text theme={null}
Group.Read.All
Group.ReadWrite.All
```
6. Add another permission under **Application permissions**:
```text theme={null}
Device.Read.All
Device.ReadWrite.All
Directory.Read.All
Group.Read.All
User.Read.All
```
7. Click **Grant admin consent for \{Your Company}**.
5. Go to **API permissions > Add a permission > Microsoft Graph > Delegated permissions** and add:
```text theme={null}
Group.Read.All
Group.ReadWrite.All
```
6. Add another permission under **Application permissions**:
```text theme={null}
Device.Read.All
Device.ReadWrite.All
Directory.Read.All
Group.Read.All
User.Read.All
```
7. Click **Grant admin consent for \{Your Company}**.
 1. Go to [**Mobility (MDM and MAM)**](https://portal.azure.com/#view/Microsoft_AAD_IAM/MdmAppsListBlade).
2. Click **Microsoft Intune** > set **MDM user scope** and **MAM user scope** to `None` > **Save**.
3. Click **Fleet** > set **MDM user scope** and **MAM user scope** to `All` > **Save**.
If devices already enrolled through Intune before this change, [let us know](mailto:support@getprimo.com) — we force the switch from Intune to Fleet with a script. Without it, those devices remain in an inconsistent state that degrades the user experience.
A deployment profile defines the default settings of devices that enroll through Autopilot, such as
* user account type (Administrator or Standard)
* default country and keyboard language
* device naming pattern (e.g. `{company}-%RAND:5%` → `{company}-23456`)
See [Microsoft's official documentation](https://learn.microsoft.com/fr-fr/autopilot/profiles) for full details.
1. **Create the profile** — go to [Intune admin center](https://intune.microsoft.com/#view/Microsoft_Intune_Enrollment/AutopilotDeploymentProfiles.ReactView) > **Devices > Enrollment > Deployment Profiles** > **+ Create profile** and complete the three steps: name, deployment mode, assignment.
2. **Create a dynamic device group** — go to [portal.azure.com](https://portal.azure.com/#view/Microsoft_AAD_IAM/GroupsManagementMenuBlade/~/Overview) > **+ Create group**, name it (e.g. "Windows Autopilot devices"), select `Dynamic devices`, and use the rule:
```text theme={null}
(device.devicePhysicalIds -any (_ -startsWith "[ZTDid]"))
```
3. **Create an Enrollment Status Page** — go to [Intune admin center](https://intune.microsoft.com/#view/Microsoft_Intune_Enrollment/EnrollmentStatusPageProfileList.ReactView) > **Devices > Enrollment > Enrollment Status Page** > **+ Create**, name the profile, enable progress display, and assign it to your dynamic group.
The logo uploaded here appears on the Autopilot sign-in screen next to a **Welcome to \{Your Company}!** title. It is also the quickest way to confirm that a device actually goes through Autopilot at first boot.
1. Sign in to [Microsoft Azure](https://portal.azure.com/), search for **Company branding**, then click **Configure** (or **Edit** if a default sign-in experience already exists).
2. Open the **Sign-in form** tab and upload your logo in both **Square logo (light theme)** and **Square logo (dark theme)**.
3. Click **Review + save**, then **Save**.
## Register your devices in Autopilot
A deployment profile only applies to devices **registered in Autopilot**. Registration is not enrollment. It links a device's hardware identity to your Entra tenant, so Windows recognizes the device at first boot and launches the Autopilot experience.
Our accredited resellers register devices ordered through Primo — nothing to do on your side. See [Device orders with Zero-Touch](/mdm/zero-touch/device-orders-zero-touch). The steps below only apply to devices acquired outside Primo.
On the device, open PowerShell as administrator and run:
```powershell theme={null}
New-Item -Type Directory -Path "C:\HWID"
Set-Location -Path "C:\HWID"
$env:Path += ";C:\Program Files\WindowsPowerShell\Scripts"
Set-ExecutionPolicy -Scope Process -ExecutionPolicy RemoteSigned
Install-Script -Name Get-WindowsAutopilotInfo -Force
Get-WindowsAutopilotInfo -OutputFile AutopilotHWID.csv
```
This generates a CSV file containing the hardware hash. [Microsoft's documentation](https://learn.microsoft.com/en-us/autopilot/add-devices#desktop-hash-export) covers other export methods.
1. Go to [Intune admin center](https://intune.microsoft.com/) > **Devices > Enrollment > Windows Autopilot > Devices**.
2. Click **Import** and upload the CSV. The import takes a few minutes — refresh the page until the device shows up.
3. Confirm the **Profile status** column reads `Assigned`. If it stays on `Not assigned`, review the assignment of your deployment profile (step 4 above).
## Test the enrollment
Validate the full flow on a single registered device before rolling out company-wide.
1. Reset the test device (**Settings > System > Recovery > Reset this PC**) or reimage it.
2. Power it on, select the country and keyboard layout, and connect to the internet.
3. Confirm the sign-in screen shows **Welcome to \{Your Company}!** with your logo — this proves the device went through Autopilot.
4. Sign in with a test employee's Entra credentials. Windows then asks to create a PIN (Windows Hello), plus a fingerprint if the hardware supports it.
5. Once the desktop loads, the device appears in the dashboard and receives the apps and policies defined there.
Devices that are **not** registered in Autopilot can still enroll automatically: during Windows setup, choose **Set up for work or school** and sign in with Entra credentials. The device enrolls in Fleet, but skips the branded Autopilot experience and the Enrollment Status Page.
## Reset or reassign a device
When a device changes hands — offboarding, replacement, repurposing — clean up its old records so it goes through Autopilot again like a brand-new device.
Trigger a remote wipe from the dashboard, or reset it locally via **Settings > System > Recovery > Reset this PC**.
Delete the device from the dashboard so the next enrollment starts from a clean record.
In [Microsoft Azure](https://portal.azure.com/), go to **Devices > All devices** and delete the stale object of the wiped device.
Never delete the device from **Windows Autopilot > Devices** — the registration must survive the wipe.
In [Intune admin center](https://intune.microsoft.com/) > **Devices > Enrollment > Windows Autopilot > Devices**, confirm the device is still registered with a **Profile status** of `Assigned`, then click **Sync** and wait for the sync to complete.
The branded welcome screen confirms Autopilot picked the device up. If the device skips Autopilot at first boot, wait a few minutes and restart it — the Autopilot service may still be processing the cleanup.
1. Go to [**Mobility (MDM and MAM)**](https://portal.azure.com/#view/Microsoft_AAD_IAM/MdmAppsListBlade).
2. Click **Microsoft Intune** > set **MDM user scope** and **MAM user scope** to `None` > **Save**.
3. Click **Fleet** > set **MDM user scope** and **MAM user scope** to `All` > **Save**.
If devices already enrolled through Intune before this change, [let us know](mailto:support@getprimo.com) — we force the switch from Intune to Fleet with a script. Without it, those devices remain in an inconsistent state that degrades the user experience.
A deployment profile defines the default settings of devices that enroll through Autopilot, such as
* user account type (Administrator or Standard)
* default country and keyboard language
* device naming pattern (e.g. `{company}-%RAND:5%` → `{company}-23456`)
See [Microsoft's official documentation](https://learn.microsoft.com/fr-fr/autopilot/profiles) for full details.
1. **Create the profile** — go to [Intune admin center](https://intune.microsoft.com/#view/Microsoft_Intune_Enrollment/AutopilotDeploymentProfiles.ReactView) > **Devices > Enrollment > Deployment Profiles** > **+ Create profile** and complete the three steps: name, deployment mode, assignment.
2. **Create a dynamic device group** — go to [portal.azure.com](https://portal.azure.com/#view/Microsoft_AAD_IAM/GroupsManagementMenuBlade/~/Overview) > **+ Create group**, name it (e.g. "Windows Autopilot devices"), select `Dynamic devices`, and use the rule:
```text theme={null}
(device.devicePhysicalIds -any (_ -startsWith "[ZTDid]"))
```
3. **Create an Enrollment Status Page** — go to [Intune admin center](https://intune.microsoft.com/#view/Microsoft_Intune_Enrollment/EnrollmentStatusPageProfileList.ReactView) > **Devices > Enrollment > Enrollment Status Page** > **+ Create**, name the profile, enable progress display, and assign it to your dynamic group.
The logo uploaded here appears on the Autopilot sign-in screen next to a **Welcome to \{Your Company}!** title. It is also the quickest way to confirm that a device actually goes through Autopilot at first boot.
1. Sign in to [Microsoft Azure](https://portal.azure.com/), search for **Company branding**, then click **Configure** (or **Edit** if a default sign-in experience already exists).
2. Open the **Sign-in form** tab and upload your logo in both **Square logo (light theme)** and **Square logo (dark theme)**.
3. Click **Review + save**, then **Save**.
## Register your devices in Autopilot
A deployment profile only applies to devices **registered in Autopilot**. Registration is not enrollment. It links a device's hardware identity to your Entra tenant, so Windows recognizes the device at first boot and launches the Autopilot experience.
Our accredited resellers register devices ordered through Primo — nothing to do on your side. See [Device orders with Zero-Touch](/mdm/zero-touch/device-orders-zero-touch). The steps below only apply to devices acquired outside Primo.
On the device, open PowerShell as administrator and run:
```powershell theme={null}
New-Item -Type Directory -Path "C:\HWID"
Set-Location -Path "C:\HWID"
$env:Path += ";C:\Program Files\WindowsPowerShell\Scripts"
Set-ExecutionPolicy -Scope Process -ExecutionPolicy RemoteSigned
Install-Script -Name Get-WindowsAutopilotInfo -Force
Get-WindowsAutopilotInfo -OutputFile AutopilotHWID.csv
```
This generates a CSV file containing the hardware hash. [Microsoft's documentation](https://learn.microsoft.com/en-us/autopilot/add-devices#desktop-hash-export) covers other export methods.
1. Go to [Intune admin center](https://intune.microsoft.com/) > **Devices > Enrollment > Windows Autopilot > Devices**.
2. Click **Import** and upload the CSV. The import takes a few minutes — refresh the page until the device shows up.
3. Confirm the **Profile status** column reads `Assigned`. If it stays on `Not assigned`, review the assignment of your deployment profile (step 4 above).
## Test the enrollment
Validate the full flow on a single registered device before rolling out company-wide.
1. Reset the test device (**Settings > System > Recovery > Reset this PC**) or reimage it.
2. Power it on, select the country and keyboard layout, and connect to the internet.
3. Confirm the sign-in screen shows **Welcome to \{Your Company}!** with your logo — this proves the device went through Autopilot.
4. Sign in with a test employee's Entra credentials. Windows then asks to create a PIN (Windows Hello), plus a fingerprint if the hardware supports it.
5. Once the desktop loads, the device appears in the dashboard and receives the apps and policies defined there.
Devices that are **not** registered in Autopilot can still enroll automatically: during Windows setup, choose **Set up for work or school** and sign in with Entra credentials. The device enrolls in Fleet, but skips the branded Autopilot experience and the Enrollment Status Page.
## Reset or reassign a device
When a device changes hands — offboarding, replacement, repurposing — clean up its old records so it goes through Autopilot again like a brand-new device.
Trigger a remote wipe from the dashboard, or reset it locally via **Settings > System > Recovery > Reset this PC**.
Delete the device from the dashboard so the next enrollment starts from a clean record.
In [Microsoft Azure](https://portal.azure.com/), go to **Devices > All devices** and delete the stale object of the wiped device.
Never delete the device from **Windows Autopilot > Devices** — the registration must survive the wipe.
In [Intune admin center](https://intune.microsoft.com/) > **Devices > Enrollment > Windows Autopilot > Devices**, confirm the device is still registered with a **Profile status** of `Assigned`, then click **Sync** and wait for the sync to complete.
The branded welcome screen confirms Autopilot picked the device up. If the device skips Autopilot at first boot, wait a few minutes and restart it — the Autopilot service may still be processing the cleanup.